Friday, August 24, 2012

Software for business use - Part One - Office Ready Professional

This is part one in a series of of reviews of software that is suitable for business and/or home use. Some software programs reviewed are free to purchase or offer a free trial. All reviews are strictly unsolicited, if I find stuff I really like, I buy it and recommend it to all my friends and business associates.

Office Ready Professional

The first program I purchased fromTemplate Zone (www.templatezone.com) a few years ago. I purchased the Platinum edition for around $150, and I still love it. The program is an add-on for Microsoft Office and integrates seamlessly with Word, Excel & Power Point. The wonderful design team have created incredible, stunning templates that are quick and simple to edit.

The first thing you need to do once you have installed the program is set up a company profile. This profile stores your company logo, address, telephone and fax numbers, tag lines - all the basic information that you need to include on all documents.

You then are faced with the decision of what to do next. By default, the program shows you the range of Word templates in an amazing gallery of ideas (see screenshot below), all designs are divided into categories to make things easier for you. Choose between flyers, reports, brochures, newsletters and more. Hard part ... hmm ... which one to use? Don't want to create a document in Word - OK ... choose Excel and you are faced with more templates that are divided into easy to browse categories. Choose from Business or Project Management, Finance, and even more. If that's not enough for you, then try Power Point templates, each template design shows the master title slide and the main section slides, all of which can be easily edited.


750 Design templates included
In all, the platinum version offers over 750 different designs! Still not enough? You can always purchase and download more templates from the template store. These additional templates are again divided into categories, so by purchasing an "expansion pack" you get more than one type of design per category.

Inbuilt Image Editor
Office Ready includes an easy to use Image Editor, each of their templates includes sample images that you can edit, change colour, or swap for your own images. To access the Image Editor, simply double click on the smiley face that indicates a photo socket.


To crop the image, simply move the red box around the image, you can resize if required.There are many other options available here also. You can choose to adjust the brightness, contrast, hue & saturation of the image, apply rotation, and more.

Change Text
The text on the template is simply in good old text boxes and is easily editable.

PDF Round Trip
One main reason I purchased this program was for the PDF round-trip. At the time of purchase, there was no easy way to convert Word documents into PDF, you had to use an expensive program such as Adobe PDF maker to create PDF files.

But Office Professional does much more than simply CONVERT your documents to PDF, it can go the other way also and convert PDF documents to Word! Wonderful idea and has saved me endless amounts of trouble.

Other features
There are many other great features of the program, such as the Colour Themes and Mail Merge options, as well as a direct link to Printing for Less.

The Colour Themes allow you to quickly change the colour scheme of your documents, for example if you need to have your company colours on your documents, you can create your own theme and then apply it to your documents. The colour theme controls the colour of text, headings, text boxes, shapes and more.

The Mail Merge option allows you to manage your mailing lists directly with the program that allows you to send the document you have made directly to your customers.


Warning

One thing I found with the program that being designed in the USA, the templates have been developed for that area and use the LETTER page layout. If you are using a different type of paper such as A4 in Australia, you will need to change the page layout to comply before printing your document. Once you do this though, the objects on the page will shift their location accordingly. I've found it much easier to adjust the page layout to A4 before I start any major editing on the document.

With the brochures, I have also found that the do not print nicely (as you would expect) with back to back printing. One side always seems to be slightly to the side - although this could also be a problem with my cheap horrible HP printer that I am waiting to die so I have an excuse to replace it (but what do you expect for $30). I have found that it is best if using a brochure design, to copy the groups of elements and paste into Publisher and then continue editing the document.

Summary

Rating 4 out of 5. Great program, great design ideas. Customer support is available, and quick. If you are looking for some creative documents to impress your clients, or for some good marketing ideas, then check it out. The 30 day trial of the program is available direct from their website at www.templatezone.com, and while there have a look around at some of the other programs available - reviews on them coming soon. Works fine with XP, Vista and 7.

Sunday, August 5, 2012

New Training Course – Intermediate Excel


Our new training course to be delivered at Wimmera Hub – 39 Urquhart Street Horsham, begins tomorrow night - Monday 6th August. This should be a great short computer course of just four sessions with each session lasting about 3 hours (including coffee break). The course is at an Intermediate level, which means you should already know how to start Excel, enter data and move around inside the spreadsheet. The course will cover
  • Formatting cells including text alignment 
  •  Creating and editing charts
  • Headings & labels
  • Basic formulas
  • Logical IF statements
  •  Conditional formatting
  • Macros
  • Creating and editing Templates
  • Absolute & relative cell referencing
  • Exporting Excel to other formats
  • Importing Excel to other programs

The course includes a 50+ page learners guide plus supporting files including sample spreadsheets, all provided on a free USB drive. So come down and join in the fun. Call Hannah at Wimmera Hub on (03) 53 82 5111 to book!

Monday, December 12, 2011

Conditional Formatting with Excel

Conditionally Formatting in Microsoft Excel is a useful tool, particularly as a student or business manager. Conditional formatting allows you to set a range of options on your data, such as sales target levels, assessments, results and much more. With conditional formatting, you can set figures or types of figures to appear against a coloured background, for example, if you wish to see a percentage of attendance for a group of students and see how the majority of the class is fairing, conditional formatting will allow you to set rules.
For example – class attendance figures:

Student Name
Attendance Rate
Observation Percent
Portfolio Percent
71.43%
90.32%
27.27%
0.00%
0.00%
0.00%
71.43%
90.32%
27.27%
42.86%
67.74%
18.18%
71.43%
90.32%
27.27%
71.43%
90.32%
27.27%
71.43%
90.32%
27.27%
57.14%
70.97%
27.27%
28.57%
41.94%
18.18%
42.86%
51.61%
9.09%


Looks rather plain, bland and boring, doesn’t it?

Define Your Rules

Now, let’s define the rules for our conditional formatting. Say we require a minimum of 50% attendance rate, and we want anything to be 49% and below to show as red. With an attendance rate of 80% or higher to be our optimum – we can set Excel to display this optimum range in green and the bits in-between (from 51-79%) can show as yellow – almost but not quite there.
-50%
Will appear like this
51%-79%
Will appear like this
80%+
Will appear like this

Set out your Spreadsheet

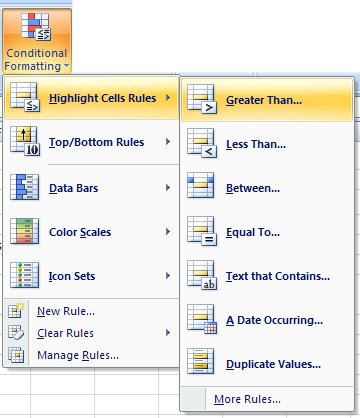
Start Excel and set out your spreadsheet. Select the rows you wish for the conditional formatting to apply. Click the CONDITIONAL FORMATTING button on the Home tab in the ribbon.

Set the Less than Option

Use the drop down arrow to select the options you wish to apply. In this example, set the first option to highlight all cells whose data is 50% or less. Choose the first option HIGHLIGHT CELLS RULES.

Follow the arrow across and choose the LESS THAN option. A dialogue box will appear for you to further set your options. You can either type the result you want, or use the select box to select a cell with the required data. The LIGHT RED FILL WITH DARK RED TEXT is set for us by default.

Click the OK button to set this option and return to your spreadsheet.

Set the Greater than Option

The cells in your spreadsheet should still be selected,  you can just continue setting your conditional formatting options. Click the CONDITIONAL FORMATTING button again, and this time select the HIGHLIGHT CELL RULES and then GREATER THAN.

Once more the dialogue box will appear on your screen. Again you can select the cell containing the data required, or you can type it directly into the box.

Use the drop down arrow to select the GREEN FILL WITH DARK GREEN TEXT which is the third default setting. Then click OK to return to your spreadsheet.

Set the between option

Finally, set the option to highlight the in-between numbers to yellow. With the cells in the spreadsheet still selected, click the CONDITIONAL FORMATTING button. Select the HIGHLIGHT CELL RULES and then across to BETWEEN.

In the dialogue box that pops up, set your additional options. Click the drop down arrow and choose the second option YELLOW FILL WITH DARK YELLOW TEXT. Click OK to return to your spreadsheet.

Completed Conditional Formatting

There you have a conditionally formatted spreadsheet. Try playing around with the figures and the colour scheme should automatically update for you.

Custom Formatting

Excel also allows you to set your own style of conditional formatting options. When setting your rules, you can choose CUSTOM style for fill and text combinations.
Have a play around with conditional formatting, it is a great tool to be able to use.