- Interpretation of state and federal awards
- Federal and state workplace relations legislation
- Checking compliance of workplace policies with workplace relations laws
- Employment law changes – transition and compliance
- Providing information about how courts and tribunals operate
- Advice and representation before federal and state industrial courts and tribunals, in respect of unfair dismissal, underpayment of wages, discrimination, unfair contracts, breach of contracts and so forth
- Unfair and unlawful dismissal risk management
- Provision of updated awards and wage rate schedules
- Drafting collective agreements
- Provision of advice on contracts of employment
- Drafting contracts of employment
- Recruitment
- Managing staff
- Workplace policies and procedures
- Managing performance
- Ending the employment relationship / termination of employment
- Redundancy
- Annual leave, sick leave, parental leave, long service leave
- Health and safety
- Performance counseling
- Independent contractor arrangements
- Workplace reform
- Day to day relations advice and support
- Provision of WR due diligence investigations and reports prior to sale or purchase of business
- Workers compensation issues
- Discrimination and equal opportunity issues
- Negotiations with trade unions
- Resolving industrial disputes
Sunday, September 14, 2014
28 Ways in which WR can help your business
If you're in business and employ staff, there may come a time when
you will need specialist workplace relations (WR) help and advice. Here
is a list of 28 ways which a WR specialist can help.

Sunday, March 30, 2014
Struggles with Social Media
Those of you who have followed me on Facebook or Twitter know of my recent struggle in the last couple of days to get this blog linked to my Facebook page. Something which after three days of trying four different apps is still eluding me. Grr.
So far today alone I have tried:
So far today alone I have tried:
- Symphony - supposedly allows you to cross post to Facebook, Twitter and Blogger. Yeah right. Facebook, Twitter & Linked In worked fine, but the blog ... a big fat NO. There support service was quick in response to my question "where am I supposed to paste this bit of code". Within 2 hours I had a response "You don't have to". So why have that as STEP 2 of 2 in your instructions???? www.symphonytools.com Syndication attempted again today, Crosspost icon is appearing on my symphony tools profile but another test post failed to appear on my blog - yet clicking on the icon TAKES me to my blog. Something is not right in the settings somewhere.
- Static HTML App - to create Landing Pages from scratch. Fantastic instructional video takes you step by step through every part of the process. One problem ... Facebook have changed the rules since it was done. No worries, it still uses HTML & CSS to create the pages, I'll create a quick flyer, convert to HTML, copy and paste the code. Err that looked terrible. OK ... we'll try a standard CSS website template, upload all the files to the website, copy the direct URL's for the images, CSS & Javascript. Yay! Beautiful. Looks perfect in Internet Explorer ... wait ... no ... what the ... It will only work in browsers OTHER than IE from sites that have SSL encryption for better security. Solution according to their help files - purchase a web hosting package from them. Err ... no. I've been with my hosts for the last fourteen years (must be about that), really don't want to start with someone new just for an app to integrate on Facey. Sorry.
- High Impact Designer - I just love this company. With a free subscription I was able to create (in a few minutes) a new tab for my Facebook page advertising some of the products & services I offer. Fantastic. A landing page, app, what ever you want to call it. So quick, so easy, so very functionable and customisble.
Symphony
Symphony is a new tool designed to bring your blog and social media posts together using a syndication process.
http://www.symphonytools.com/home
Simply register for a free trial and link your Facebook, Twitter, Blog and LinkedIn accounts to make cross posting fast and simple.
This is actually a test post typed on my iPad to check the system actually works! More details, images and a review to follow.
http://www.symphonytools.com/home
Simply register for a free trial and link your Facebook, Twitter, Blog and LinkedIn accounts to make cross posting fast and simple.
This is actually a test post typed on my iPad to check the system actually works! More details, images and a review to follow.
Wednesday, September 12, 2012
Software Review – Copper POS software from NCH Software
This is the 3rd in our series of software for business use, and this week I’ve been reviewing the latest version of Copper Point of Sale software. I’ve used this software before in testing it out for clients and I must say I can’t see any difference between this version and the previous version.
The product itself it quite simple to set up and install, and let’s not forget, this is a FREE product. You can download the product from http://www.nchsoftware.com/point-of-sale/index.html.
 The installation of the program is quite simple, simply follow the wizard to install to your preferred directory on your computer. As this was a test install, I just followed the defaults and installed to the C drive of my test machine.
This first screen simply asks for some basic information about your business such as:
• Business name
• Address
• Contact
This information is going to be used for generating reports. Simply type in the information and click next.

The next step is to set up the Administrators account. Simply type in their names and give a password if desired. The password is not required for setup, and can be skipped by leaving the fields empty. Simply click NEXT to go on.

You will now receive a message that you have completed the setup and are ready to add the details of your sales team.
Note: You also have the ability to set the users permissions whether to grant them ADMINISTRATOR privileges or salesperson’s privileges at this point.

This is where you list your inventory that you are going to have for sale. More on this later in the review.
Add Salespersons
Same as above, simply just allows you to add another sales person.
Configure options
This allows you to change any of the settings used in the initial set up of the program.

This will give you yet another simple form to complete, add an item code for the item, and a description. The program will also require you to give a unit value and to define the tax amount. This rate and definition can also be changed in the OPTIONS. Simply click on OK to add the item to the database.
 The ITEMS LIST will allow you to view all the products and/or services you have in the database and edit, delete or add other items as required.


Adjust quantity
To adjust the quantity of the item being sold, click on the ADJUST QUANTITY button, and an options screen will appear.

This screen allows you to input directly the new quantity, or you can choose to show an on screen keyboard that will allow you to select the number required. The amount owing will now be automatically updated.
To add a discount
To add a discount to the item, click the ADJUST ITEM DISCOUNT button and apply the relevant discount, this can again be in a dollar amount or it can be a percentage amount. Click OK to return to the main screen and the discount is automatically applied to the new total.

 Input a reference and click the ADD PAYMENT button, then the RECORD BUTTON.
You should now have a section on the bottom of the screen appearing that will allow you to view or print the receipt.
Preview Receipt
You can preview the receipt by pressing the VIEW RECEIPT button.
Print receipt
Print the receipt to the required printer
Complete the sale
Press the NEW TRANSACTION button to finalise the sale and clear the screen.
This will allow you to
 To refund entirely, select the transaction required and click the PROCESS REFUND button.
Ensure you give a reference code and click the ADD REFUND button. Then click RECORD. You can now print the refund notice for the customer.

The system does not appear to integrate with other POS equipment such as bar code scanners or cash drawers. There also does not seem to be a way to get a total report such as combined records of sales and refunds to show how much cash remains in the business or whether money has been diverted to other funds such as the business chequing account.
This may be useful for small micro business systems that work from home and just need something simple to produce reports such as receipts for their customers if they have a book keeper to assist with the other recording requirements, particularly for tax purposes.
The product itself it quite simple to set up and install, and let’s not forget, this is a FREE product. You can download the product from http://www.nchsoftware.com/point-of-sale/index.html.
To set up

This first screen simply asks for some basic information about your business such as:
• Business name
• Address
• Contact
This information is going to be used for generating reports. Simply type in the information and click next.

The next step is to set up the Administrators account. Simply type in their names and give a password if desired. The password is not required for setup, and can be skipped by leaving the fields empty. Simply click NEXT to go on.

You will now receive a message that you have completed the setup and are ready to add the details of your sales team.
Don’t worry too much about the information you put in here, if you need to change it later at any time you can through the Configure options.
Add sales team info
The sales team info is again quite simple and straight forward, simply type the relevant details into the boxes.Note: You also have the ability to set the users permissions whether to grant them ADMINISTRATOR privileges or salesperson’s privileges at this point.

To Do List
The program then gives you a TO DO LIST. This is virtually just an outline of the menu items down the left hand side of the screen. These options include:- Create Items
- Add Salespersons
- Configure options
This is where you list your inventory that you are going to have for sale. More on this later in the review.
Add Salespersons
Same as above, simply just allows you to add another sales person.
Configure options
This allows you to change any of the settings used in the initial set up of the program.
Create New Item
The system works like a database that stores information about your products and/or services that you have for sale. To ADD an item to the database, use the CREATE NEW ITEM menu text link on the left side of screen.
This will give you yet another simple form to complete, add an item code for the item, and a description. The program will also require you to give a unit value and to define the tax amount. This rate and definition can also be changed in the OPTIONS. Simply click on OK to add the item to the database.
The Items List

Gift or Discount Coupons
From here you can also create new coupons, such as gift cards. Simply click the ADD COUPON button. The program provides and easy date picker to select the expiry date of the coupon. You have the option to either create a dollar value coupon or a percentage. This may be useful for marketing or group discounts, or loyalty cards.
Recording a sale
To record a sale, click the SELECT ITEM button , this will bring up the ITEMS LIST. Simply double click on the item you wish to bring up as the sale. Click on the item to display the additional options such as ADJUST QUANTITY, or ADJUST DISCOUNT.
Adjust quantity
To adjust the quantity of the item being sold, click on the ADJUST QUANTITY button, and an options screen will appear.
This screen allows you to input directly the new quantity, or you can choose to show an on screen keyboard that will allow you to select the number required. The amount owing will now be automatically updated.
To add a discount
To add a discount to the item, click the ADJUST ITEM DISCOUNT button and apply the relevant discount, this can again be in a dollar amount or it can be a percentage amount. Click OK to return to the main screen and the discount is automatically applied to the new total.
Take Payments
To settle the account, click the PAY BUTTON, and the SETTLEMENT screen appears. You can also use the keyboard shortcut key of F4 to access this screen. Select one of three payment options:- Cash
- Credit
- Cheque

You should now have a section on the bottom of the screen appearing that will allow you to view or print the receipt.
Preview Receipt
You can preview the receipt by pressing the VIEW RECEIPT button.
Print receipt
Print the receipt to the required printer
Complete the sale
Press the NEW TRANSACTION button to finalise the sale and clear the screen.
Refunding Items
Should you need to refund an item, you can do that simply using the REFUND button at the TOP of the screen.This will allow you to
- Browse transactions
- Enter a transaction code
- Adjust the quantity
- Adjust the discount
- Reverse the sale

Ensure you give a reference code and click the ADD REFUND button. Then click RECORD. You can now print the refund notice for the customer.

Note: Although this refund notice will also say RECIPT, for the refund number it will have the reference of RFD indicating it is a refund.
Reports
The program will allow you to create a number of reports such as:- Sales
- Refunds
- Salesperson
Summary
In summary this appears to be quite a useful free program. It’s easy to set up and use. The devleopers have offered it for free in the hope that you will purchase the Suite of programs such as Inventory that will build more robust and complete system for your business.The system does not appear to integrate with other POS equipment such as bar code scanners or cash drawers. There also does not seem to be a way to get a total report such as combined records of sales and refunds to show how much cash remains in the business or whether money has been diverted to other funds such as the business chequing account.
This may be useful for small micro business systems that work from home and just need something simple to produce reports such as receipts for their customers if they have a book keeper to assist with the other recording requirements, particularly for tax purposes.
Monday, September 3, 2012
Software Review – Part 2 Free Screen Recorder
The Free Screen Recorder is a great little program from NBX Soft http://www.nbxsoft.com/download-screen-recorder.php. Don’t be fooled by the name – the program is only free for a trial of about 10 screen captures, after this, you must register the program – at a fee. The registration fee is around $30 US (or was when I registered it a year or so ago), so it’s not an amount to get too stressed over.
It’s quite simple to use and set up, the program comes with default hotkeys and has the option to record sound from your microphone. This makes it perfect for creating your own tutorials as it captures mouse clicks and generally what ever is on your screen.

As you can see from the screenshot, the interface is quite simple and fairly intuitive. The red button to record, blue button to stop, the gear for settings, video for output, microphone for sound input settings, cursor for cursor capture settings, keyboard for hotkey settings.

This button controls the screen layout for the recording process, here you can choose to set the size of the screen to be recorded to a set size in the number of pixels, or full screen, or a number of other options. By default, the screen size is set to 320 x240 and is a fixed region. If you wish to change this size and/or the recording location, click the SELECT FIXED REGION button, this will allow you to draw the size and location required. Note: This selection will only remain for the duration of this session, if you close the program it does not remember your settings.

The program comes with a variety of codecs pre-installed for you to select as your output. By default, the Microsoft Video 1 codec is selected, you may switch to a different codec if you prefer using the drop down arrow. Other options here include
I’ve found the program works best at the default settings, this seems to have a reasonable file size with watchable quality.

Clicking on the microphone icon will open the audio options. This will allow you to select if you wish to record sound or not. By default this option is turned off, you will need to tick the RECORD SOUND box if you wish to record sound from your microphone. Again, you can make additional changes regarding the output used if required. Capture Cursor Options The blue button displaying a cursor allows you to select if you wish to capture the computers cursor or not. There are a number of useful options here: You can choose:
Under Show Cursor, you have additional options such as the default to use the actual cursor on your computer, but you can choose a custom cursor such as those installed on your computer, or another custom icon that you may have installed on your computer. What might be helpful for trainers is the HIGHLIGHT CURSOR option, which allows you to choose between different shapes:
And also different colours, clicking on the COLOUR button will display a pallete that you can choose from, or you can create your own custom colour using the hex codes by adjusting the RGB values.
The Interface

As you can see from the screenshot, the interface is quite simple and fairly intuitive. The red button to record, blue button to stop, the gear for settings, video for output, microphone for sound input settings, cursor for cursor capture settings, keyboard for hotkey settings.
Record function
The record function, the red button, is set by default to F8 for a Hotkey, this of course can be changed if you prefer using the hotkey settings. Once you click record, the size of the screen selected in General settings will appear as a green flashing square allowing you to select the specific are you wish captured. Simply click the screen to begin the recording process.It is recommended to set the General Program preferences first!
The Stop button
The blue stop button simply stops the recording and brings up the SAVE AS dialog box automatically, by default the save location is a folder inside the installation folder such as Program Files / Free Screen Recorder, but you can change this save location during the SAVE AS dialog. The program will then reformat your video according to the video output setting chosen and will play using your default video player when complete.The General Settings button

This button controls the screen layout for the recording process, here you can choose to set the size of the screen to be recorded to a set size in the number of pixels, or full screen, or a number of other options. By default, the screen size is set to 320 x240 and is a fixed region. If you wish to change this size and/or the recording location, click the SELECT FIXED REGION button, this will allow you to draw the size and location required. Note: This selection will only remain for the duration of this session, if you close the program it does not remember your settings.
The Video Output (Codecs)

The program comes with a variety of codecs pre-installed for you to select as your output. By default, the Microsoft Video 1 codec is selected, you may switch to a different codec if you prefer using the drop down arrow. Other options here include
- Frame rate
- Playback rate
I’ve found the program works best at the default settings, this seems to have a reasonable file size with watchable quality.
Audio Options

Clicking on the microphone icon will open the audio options. This will allow you to select if you wish to record sound or not. By default this option is turned off, you will need to tick the RECORD SOUND box if you wish to record sound from your microphone. Again, you can make additional changes regarding the output used if required. Capture Cursor Options The blue button displaying a cursor allows you to select if you wish to capture the computers cursor or not. There are a number of useful options here: You can choose:
- Hide cursor
- Show Cursor
Under Show Cursor, you have additional options such as the default to use the actual cursor on your computer, but you can choose a custom cursor such as those installed on your computer, or another custom icon that you may have installed on your computer. What might be helpful for trainers is the HIGHLIGHT CURSOR option, which allows you to choose between different shapes:
- Circle
- Ellipse
- Square
- Rectangle
And also different colours, clicking on the COLOUR button will display a pallete that you can choose from, or you can create your own custom colour using the hex codes by adjusting the RGB values.
Keyboard Hotkeys
This final option allows you to select your own keyboard hotkeys. This is pretty intuitive, simply click the drop down box and select the key you prefer. Click OK to confirm.Summary
In summary, this program is great if you want to record something that’s happening on the screen such as a tutorial on how to perform a certain task on the computer. The recorded sound output is not great, it tends to be far quieter than you would expect, so if recording your own voice, be aware you will have to speak loudly and clearly. The file sizes can tend to be large, depending on the size of the video captured and the codecs used in the output. You may like to fiddle with the settings to find something that is suitable for you, depending on what you are going to use the outputted file for. The files may be too large to place on the internet, but may be fine for recording onto a CD or DVD.Friday, August 24, 2012
Software for business use - Part One - Office Ready Professional
This is part one in a series of of reviews of software that is suitable for business and/or home use. Some software programs reviewed are free to purchase or offer a free trial. All reviews are strictly unsolicited, if I find stuff I really like, I buy it and recommend it to all my friends and business associates.
The first thing you need to do once you have installed the program is set up a company profile. This profile stores your company logo, address, telephone and fax numbers, tag lines - all the basic information that you need to include on all documents.
You then are faced with the decision of what to do next. By default, the program shows you the range of Word templates in an amazing gallery of ideas (see screenshot below), all designs are divided into categories to make things easier for you. Choose between flyers, reports, brochures, newsletters and more. Hard part ... hmm ... which one to use? Don't want to create a document in Word - OK ... choose Excel and you are faced with more templates that are divided into easy to browse categories. Choose from Business or Project Management, Finance, and even more. If that's not enough for you, then try Power Point templates, each template design shows the master title slide and the main section slides, all of which can be easily edited.

750 Design templates included
In all, the platinum version offers over 750 different designs! Still not enough? You can always purchase and download more templates from the template store. These additional templates are again divided into categories, so by purchasing an "expansion pack" you get more than one type of design per category.
Inbuilt Image Editor
Office Ready includes an easy to use Image Editor, each of their templates includes sample images that you can edit, change colour, or swap for your own images. To access the Image Editor, simply double click on the smiley face that indicates a photo socket.

To crop the image, simply move the red box around the image, you can resize if required.There are many other options available here also. You can choose to adjust the brightness, contrast, hue & saturation of the image, apply rotation, and more.
 Change Text
The text on the template is simply in good old text boxes and is easily editable.
PDF Round Trip
One main reason I purchased this program was for the PDF round-trip. At the time of purchase, there was no easy way to convert Word documents into PDF, you had to use an expensive program such as Adobe PDF maker to create PDF files.
But Office Professional does much more than simply CONVERT your documents to PDF, it can go the other way also and convert PDF documents to Word! Wonderful idea and has saved me endless amounts of trouble.
Other features
There are many other great features of the program, such as the Colour Themes and Mail Merge options, as well as a direct link to Printing for Less.
The Colour Themes allow you to quickly change the colour scheme of your documents, for example if you need to have your company colours on your documents, you can create your own theme and then apply it to your documents. The colour theme controls the colour of text, headings, text boxes, shapes and more.
The Mail Merge option allows you to manage your mailing lists directly with the program that allows you to send the document you have made directly to your customers.
With the brochures, I have also found that the do not print nicely (as you would expect) with back to back printing. One side always seems to be slightly to the side - although this could also be a problem with my cheap horrible HP printer that I am waiting to die so I have an excuse to replace it (but what do you expect for $30). I have found that it is best if using a brochure design, to copy the groups of elements and paste into Publisher and then continue editing the document.
Office Ready Professional
The first program I purchased fromTemplate Zone (www.templatezone.com) a few years ago. I purchased the Platinum edition for around $150, and I still love it. The program is an add-on for Microsoft Office and integrates seamlessly with Word, Excel & Power Point. The wonderful design team have created incredible, stunning templates that are quick and simple to edit.The first thing you need to do once you have installed the program is set up a company profile. This profile stores your company logo, address, telephone and fax numbers, tag lines - all the basic information that you need to include on all documents.
You then are faced with the decision of what to do next. By default, the program shows you the range of Word templates in an amazing gallery of ideas (see screenshot below), all designs are divided into categories to make things easier for you. Choose between flyers, reports, brochures, newsletters and more. Hard part ... hmm ... which one to use? Don't want to create a document in Word - OK ... choose Excel and you are faced with more templates that are divided into easy to browse categories. Choose from Business or Project Management, Finance, and even more. If that's not enough for you, then try Power Point templates, each template design shows the master title slide and the main section slides, all of which can be easily edited.

750 Design templates included
In all, the platinum version offers over 750 different designs! Still not enough? You can always purchase and download more templates from the template store. These additional templates are again divided into categories, so by purchasing an "expansion pack" you get more than one type of design per category.
Inbuilt Image Editor
Office Ready includes an easy to use Image Editor, each of their templates includes sample images that you can edit, change colour, or swap for your own images. To access the Image Editor, simply double click on the smiley face that indicates a photo socket.

To crop the image, simply move the red box around the image, you can resize if required.There are many other options available here also. You can choose to adjust the brightness, contrast, hue & saturation of the image, apply rotation, and more.

The text on the template is simply in good old text boxes and is easily editable.
PDF Round Trip
One main reason I purchased this program was for the PDF round-trip. At the time of purchase, there was no easy way to convert Word documents into PDF, you had to use an expensive program such as Adobe PDF maker to create PDF files.
But Office Professional does much more than simply CONVERT your documents to PDF, it can go the other way also and convert PDF documents to Word! Wonderful idea and has saved me endless amounts of trouble.
Other features
There are many other great features of the program, such as the Colour Themes and Mail Merge options, as well as a direct link to Printing for Less.
The Colour Themes allow you to quickly change the colour scheme of your documents, for example if you need to have your company colours on your documents, you can create your own theme and then apply it to your documents. The colour theme controls the colour of text, headings, text boxes, shapes and more.
The Mail Merge option allows you to manage your mailing lists directly with the program that allows you to send the document you have made directly to your customers.
Warning
One thing I found with the program that being designed in the USA, the templates have been developed for that area and use the LETTER page layout. If you are using a different type of paper such as A4 in Australia, you will need to change the page layout to comply before printing your document. Once you do this though, the objects on the page will shift their location accordingly. I've found it much easier to adjust the page layout to A4 before I start any major editing on the document.With the brochures, I have also found that the do not print nicely (as you would expect) with back to back printing. One side always seems to be slightly to the side - although this could also be a problem with my cheap horrible HP printer that I am waiting to die so I have an excuse to replace it (but what do you expect for $30). I have found that it is best if using a brochure design, to copy the groups of elements and paste into Publisher and then continue editing the document.
Summary
Rating 4 out of 5. Great program, great design ideas. Customer support is available, and quick. If you are looking for some creative documents to impress your clients, or for some good marketing ideas, then check it out. The 30 day trial of the program is available direct from their website at www.templatezone.com, and while there have a look around at some of the other programs available - reviews on them coming soon. Works fine with XP, Vista and 7.Sunday, August 5, 2012
New Training Course – Intermediate Excel
Our new training course to be delivered at Wimmera Hub – 39 Urquhart
Street Horsham, begins tomorrow night - Monday 6th August. This
should be a great short computer course of just four sessions with each session
lasting about 3 hours (including coffee break). The course is at an
Intermediate level, which means you should already know how to start Excel,
enter data and move around inside the spreadsheet. The course will cover
- Formatting cells including text alignment
- Creating and editing charts
- Headings & labels
- Basic formulas
- Logical IF statements
- Conditional formatting
- Macros
- Creating and editing Templates
- Absolute & relative cell referencing
- Exporting Excel to other formats
- Importing Excel to other programs
The course includes a 50+ page learners guide plus
supporting files including sample spreadsheets, all provided on a free USB
drive. So come down and join in the fun. Call Hannah at Wimmera Hub on (03) 53 82 5111 to
book!
Monday, December 12, 2011
Conditional Formatting with Excel
Conditionally Formatting in Microsoft Excel is a useful tool, particularly as a student or business manager. Conditional formatting allows you to set a range of options on your data, such as sales target levels, assessments, results and much more. With conditional formatting, you can set figures or types of figures to appear against a coloured background, for example, if you wish to see a percentage of attendance for a group of students and see how the majority of the class is fairing, conditional formatting will allow you to set rules.
For example – class attendance figures:
Student Name | Attendance Rate | Observation Percent | Portfolio Percent |
71.43% | 90.32% | 27.27% | |
0.00% | 0.00% | 0.00% | |
71.43% | 90.32% | 27.27% | |
42.86% | 67.74% | 18.18% | |
71.43% | 90.32% | 27.27% | |
71.43% | 90.32% | 27.27% | |
71.43% | 90.32% | 27.27% | |
57.14% | 70.97% | 27.27% | |
28.57% | 41.94% | 18.18% | |
42.86% | 51.61% | 9.09% |
Looks rather plain, bland and boring, doesn’t it?
Define Your Rules
Now, let’s define the rules for our conditional formatting. Say we require a minimum of 50% attendance rate, and we want anything to be 49% and below to show as red. With an attendance rate of 80% or higher to be our optimum – we can set Excel to display this optimum range in green and the bits in-between (from 51-79%) can show as yellow – almost but not quite there.
-50% | Will appear like this |
51%-79% | Will appear like this |
80%+ | Will appear like this |
Set out your Spreadsheet
Start Excel and set out your spreadsheet. Select the rows you wish for the conditional formatting to apply. Click the CONDITIONAL FORMATTING button on the Home tab in the ribbon.

Set the Less than Option
Use the drop down arrow to select the options you wish to apply. In this example, set the first option to highlight all cells whose data is 50% or less. Choose the first option HIGHLIGHT CELLS RULES.

Follow the arrow across and choose the LESS THAN option. A dialogue box will appear for you to further set your options. You can either type the result you want, or use the select box to select a cell with the required data. The LIGHT RED FILL WITH DARK RED TEXT is set for us by default.

Click the OK button to set this option and return to your spreadsheet.
Set the Greater than Option
The cells in your spreadsheet should still be selected, you can just continue setting your conditional formatting options. Click the CONDITIONAL FORMATTING button again, and this time select the HIGHLIGHT CELL RULES and then GREATER THAN.
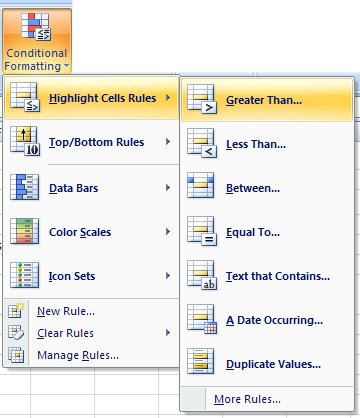
Once more the dialogue box will appear on your screen. Again you can select the cell containing the data required, or you can type it directly into the box.

Use the drop down arrow to select the GREEN FILL WITH DARK GREEN TEXT which is the third default setting. Then click OK to return to your spreadsheet.
Set the between option
Finally, set the option to highlight the in-between numbers to yellow. With the cells in the spreadsheet still selected, click the CONDITIONAL FORMATTING button. Select the HIGHLIGHT CELL RULES and then across to BETWEEN.

In the dialogue box that pops up, set your additional options. Click the drop down arrow and choose the second option YELLOW FILL WITH DARK YELLOW TEXT. Click OK to return to your spreadsheet.

Completed Conditional Formatting
There you have a conditionally formatted spreadsheet. Try playing around with the figures and the colour scheme should automatically update for you.

Custom Formatting
Excel also allows you to set your own style of conditional formatting options. When setting your rules, you can choose CUSTOM style for fill and text combinations.
Have a play around with conditional formatting, it is a great tool to be able to use.
Saturday, June 4, 2011
Windows 8 and Touch Screen Technology
The next generation of Windows for the personal computer is not due for a little while yet, and while developers are still working on it, they have released a teaser video that shows how the new desktop interface will look and work. You can see this video from the Microsoft Corporation's YouTube Channel available at http://www.youtube.com/watch?v=p92QfWOw88I
What this video shows is a beautiful looking creation that is wonderfully adaptable for the tablet pc and smaller screens. The touch screen interface is intuitive and will be easy to navigate by the appearance of apps instead of the old START menu that has been around almost since Windows began.
By using apps, you can quickly and easily flick between installed programs using a flick of the finger, or just by swiping the screen to move the menu. The layout is clean and neat, with applications installed in a grid – so you're not searching through lists of items trying to find one line of text and sometimes not sure which folder it could be in.
Using this arrangement, some people have said that the days of input using a keyboard and mouse are finally dead. With a touch screen keyboard, and even the functionality of a "thumb layout" for those who type with their thumbs, this may be true. Although Microsoft's Corporate Vice President for the Windows User Experience team has said recently that "Although the new user interface is designed and optimized for touch, it works equally well with a mouse and keyboard. Our approach means no compromises — you get to use whatever kind of device you prefer, with peripherals you choose, to run the apps you love." - http://www.microsoft.com/presspass/features/2011/jun11/06-01corporatenews.aspx%20retrieved%204/6/2011.
Friday, April 22, 2011
Choosing a platform for your website
Now that you have decided to get your own website, there are some things you need to work out. If you haven’t already purchased a domain name, that should be your first step. A domain name is the name of your company or business location on the Internet. It is the address for your website. If you have not read our previous post on webjargon and terminology, I recommend that you read it and that you are familiar with the terms
• Domain Name
• Web Host
When it comes to actually designing your website, it is a good idea to shop around for a designer and some ideas on what you want your site to look like. Do you have some favourite colours, or do you need to include a business logo? When choosing a designer, ask if you can see a portfolio of some of their work.


With a content management system, any user given the correct priviledges can create articles just by using a form that looks very similar to a word processor. This makes it easy for those who don’t know anything about websites and how to update them able to add content and update their site on their own without having to pay someone to do it for them.
You can use templates to quickly and easily update the look of your site and use extensions to add shopping carts, discussion forums, quick chat software and many more.
• Domain Name
• Web Host
When it comes to actually designing your website, it is a good idea to shop around for a designer and some ideas on what you want your site to look like. Do you have some favourite colours, or do you need to include a business logo? When choosing a designer, ask if you can see a portfolio of some of their work.
Web Platform types
There are many types of websites a designer may come up with. These could includeHTML
A HTML website is the simplest and easiest form of website. This is usually just a combination of text and images such as
HTML with Flash
This type of website uses Flash animation only in small amounts, such as an introductory header or as part of the navigation system.
All Flash
This type of website is based entirely on Flash animation such as a photo gallery. The navigational buttons and text are all flash scripts.
Content Management Systems
Alternatively, you may wish to use a CMS for your website. A Content Management System is simple to use once it is in place. This may include using Joomla, Word Press, Moodle, among others.
With a content management system, any user given the correct priviledges can create articles just by using a form that looks very similar to a word processor. This makes it easy for those who don’t know anything about websites and how to update them able to add content and update their site on their own without having to pay someone to do it for them.
You can use templates to quickly and easily update the look of your site and use extensions to add shopping carts, discussion forums, quick chat software and many more.
What you choose will be dependant on your requirements, and what you can afford. Have a talk with your designer, and take advantage of their experience and guidance.
Subscribe to:
Posts (Atom)