Monday, December 12, 2011

Conditional Formatting with Excel

Conditionally Formatting in Microsoft Excel is a useful tool, particularly as a student or business manager. Conditional formatting allows you to set a range of options on your data, such as sales target levels, assessments, results and much more. With conditional formatting, you can set figures or types of figures to appear against a coloured background, for example, if you wish to see a percentage of attendance for a group of students and see how the majority of the class is fairing, conditional formatting will allow you to set rules.
For example – class attendance figures:

Student Name
Attendance Rate
Observation Percent
Portfolio Percent
71.43%
90.32%
27.27%
0.00%
0.00%
0.00%
71.43%
90.32%
27.27%
42.86%
67.74%
18.18%
71.43%
90.32%
27.27%
71.43%
90.32%
27.27%
71.43%
90.32%
27.27%
57.14%
70.97%
27.27%
28.57%
41.94%
18.18%
42.86%
51.61%
9.09%


Looks rather plain, bland and boring, doesn’t it?

Define Your Rules

Now, let’s define the rules for our conditional formatting. Say we require a minimum of 50% attendance rate, and we want anything to be 49% and below to show as red. With an attendance rate of 80% or higher to be our optimum – we can set Excel to display this optimum range in green and the bits in-between (from 51-79%) can show as yellow – almost but not quite there.
-50%
Will appear like this
51%-79%
Will appear like this
80%+
Will appear like this

Set out your Spreadsheet

Start Excel and set out your spreadsheet. Select the rows you wish for the conditional formatting to apply. Click the CONDITIONAL FORMATTING button on the Home tab in the ribbon.

Set the Less than Option

Use the drop down arrow to select the options you wish to apply. In this example, set the first option to highlight all cells whose data is 50% or less. Choose the first option HIGHLIGHT CELLS RULES.

Follow the arrow across and choose the LESS THAN option. A dialogue box will appear for you to further set your options. You can either type the result you want, or use the select box to select a cell with the required data. The LIGHT RED FILL WITH DARK RED TEXT is set for us by default.

Click the OK button to set this option and return to your spreadsheet.

Set the Greater than Option

The cells in your spreadsheet should still be selected,  you can just continue setting your conditional formatting options. Click the CONDITIONAL FORMATTING button again, and this time select the HIGHLIGHT CELL RULES and then GREATER THAN.
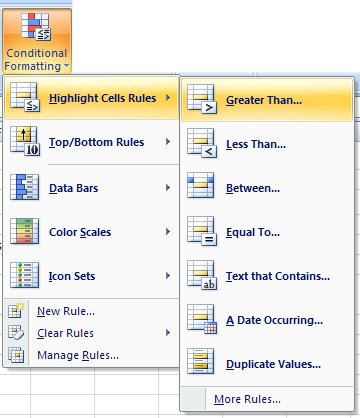
Once more the dialogue box will appear on your screen. Again you can select the cell containing the data required, or you can type it directly into the box.

Use the drop down arrow to select the GREEN FILL WITH DARK GREEN TEXT which is the third default setting. Then click OK to return to your spreadsheet.

Set the between option

Finally, set the option to highlight the in-between numbers to yellow. With the cells in the spreadsheet still selected, click the CONDITIONAL FORMATTING button. Select the HIGHLIGHT CELL RULES and then across to BETWEEN.

In the dialogue box that pops up, set your additional options. Click the drop down arrow and choose the second option YELLOW FILL WITH DARK YELLOW TEXT. Click OK to return to your spreadsheet.

Completed Conditional Formatting

There you have a conditionally formatted spreadsheet. Try playing around with the figures and the colour scheme should automatically update for you.

Custom Formatting

Excel also allows you to set your own style of conditional formatting options. When setting your rules, you can choose CUSTOM style for fill and text combinations.
Have a play around with conditional formatting, it is a great tool to be able to use.

Saturday, June 4, 2011

Windows 8 and Touch Screen Technology


The next generation of Windows for the personal computer is not due for a little while yet, and while developers are still working on it, they have released a teaser video that shows how the new desktop interface will look and work. You can see this video from the Microsoft Corporation's YouTube Channel available at http://www.youtube.com/watch?v=p92QfWOw88I


What this video shows is a beautiful looking creation that is wonderfully adaptable for the tablet pc and smaller screens. The touch screen interface is intuitive and will be easy to navigate by the appearance of apps instead of the old START menu that has been around almost since Windows began.
By using apps, you can quickly and easily flick between installed programs using a flick of the finger, or just by swiping the screen to move the menu. The layout is clean and neat, with applications installed in a grid – so you're not searching through lists of items trying to find one line of text and sometimes not sure which folder it could be in.
Using this arrangement, some people have said that the days of input using a keyboard and mouse are finally dead. With a touch screen keyboard, and even the functionality of a "thumb layout" for those who type with their thumbs, this may be true. Although Microsoft's Corporate Vice President for the Windows User Experience team has said recently that "Although the new user interface is designed and optimized for touch, it works equally well with a mouse and keyboard. Our approach means no compromises — you get to use whatever kind of device you prefer, with peripherals you choose, to run the apps you love." - http://www.microsoft.com/presspass/features/2011/jun11/06-01corporatenews.aspx%20retrieved%204/6/2011.

Friday, April 22, 2011

Choosing a platform for your website

Now that you have decided to get your own website, there are some things you need to work out. If you haven’t already purchased a domain name, that should be your first step. A domain name is the name of your company or business location on the Internet. It is the address for your website. If you have not read our previous post on webjargon and terminology, I recommend that you read it and that you are familiar with the terms
• Domain Name
• Web Host

When it comes to actually designing your website, it is a good idea to shop around for a designer and some ideas on what you want your site to look like. Do you have some favourite colours, or do you need to include a business logo? When choosing a designer, ask if you can see a portfolio of some of their work.

Web Platform types

There are many types of websites a designer may come up with. These could include

HTML

A HTML website is the simplest and easiest form of website. This is usually just a combination of text and images such as


HTML with Flash

This type of website uses Flash animation only in small amounts, such as an introductory header or as part of the navigation system.


All Flash

This type of website is based entirely on Flash animation such as a photo gallery. The navigational buttons and text are all flash scripts.


Content Management Systems

Alternatively, you may wish to use a CMS for your website. A Content Management System is simple to use once it is in place. This may include using Joomla, Word Press, Moodle, among others.


With a content management system, any user given the correct priviledges can create articles just by using a form that looks very similar to a word processor. This makes it easy for those who don’t know anything about websites and how to update them able to add content and update their site on their own without having to pay someone to do it for them.
You can use templates to quickly and easily update the look of your site and use extensions to add shopping carts, discussion forums, quick chat software and many more.


What you choose will be dependant on your requirements, and what you can afford. Have a talk with your designer, and take advantage of their experience and guidance.